Tuesday, June 28, 2011

Lions and tigers and bears.....

OK, so there are no lions or tigers, but there is a bobcat and a bear. Two bears, actually; a mama black bear and her cub. The fun part starts now! Prepping the wall and laying out the landscape was tedious (so I can only imagine how boring it is just reading about it), but painting the critters is why I signed up for this job.

mama black bear
The original plan was to map out the entire mural, with exact locations for all the plants and animals, before starting to paint any of them. After many attempts, and many wasted hours staring at blank paper, I realized that I needed a new plan. In the famous words of some marketing genius, I decided to "just do it". Using the original concept sketch as a guide, and correcting for scale, I have put up the first of the mammals. This feels like a much more natural way of working for me, and if the mural really is going to "evolve" then the methods should be able to adapt as well. The animals are just sketched in at this point. The details will come later after I make sure everything is in its proper place.
black bear cub
 I started with the mammals for several reasons. First, they are generally larger than the other creatures and I have to make sure I fit them all in. Second, they can become focal points around which I design little vignettes of plants and animals. Third, they're just cool!

white-tailed doe and fawns
gray squirrel
But just because an animal is large doesn't mean that I will paint it large in the mural. If I made them all life-sized there wouldn't be room for everything. For example, the white-tailed doe and fawns are placed on a hill in the distance, so the actual size of their image is about the same as the image of the gray squirrel, who is represented life-sized, and sits on top of one of the doors right up "front". I could not resist having one large life-sized mammal, so I chose the mama and baby black bear. They definitely take up a lot of room in the foreground, but once I get all the details in and fill in their environment with plants and other small creatures, I think it will become a very effective vignette. I have to save room in the foreground for all the smaller creatures, because if I put them in the distance they would be too tiny to be recognizable.
bobcat
As I have said before, the room I am working in is used for teaching and there are usually kids and counselors around while I'm working. When I was working on the layout no one spoke to me much or asked me any questions about what I was doing. But the critters really draw people out. I now get all kinds of questions and comments. The purpose of the mural is to teach and inspire, so I am pleased to say that it is already working, even though it is still several months to completion. A young man asked me yesterday "Are you a good artist?" I hesitated with my answer, but finally said "Well, I work really hard and I enjoy what I do." Maybe there is a kid out there who has a secret desire to be an artist. If so, I hope that kid finds me. I'll tell him that being an artist is more about working hard, believing in yourself, and doing what you love than it is about talent.
spotted skunk, curled up asleep at the base of a tree

Monday, June 20, 2011

Rock(y) Week

The plan last week was to head out to Triple C Camp to work on the mural twice. I wanted to get the rocks sketched in to the stream and its banks and start placing the large mammals. Things did not turn out exactly as I had planned....

An unexpected trip to the ER early in the week really threw me for a loop. It was for a family member, and everything is going to be OK, but it was scary, took a whole day, and really made the rest of the week "rocky". I know, it sounds corny, but sometimes art really does imitate life, or is that vice versa?

I did manage to get the rocks sketched in. Some people might be able to think "boulder" and have just the right shape and size materialize from their brush. But not me. I need to look at boulders, or pictures of boulders, for that to happen. Since I cannot actually haul large boulders in to sketch from them, I had to look at lots of pictures and try to put together a montage that I thought would fit nicely into the contours of the little stream running through the mural. I looked at lots of pictures, put it together, scaled it down, and was ready to paint.

Let's just say I'm not exactly happy with the way it came out. Who knows, if I'd been having a better week I might have spent more time looking at photos, or whatever. Part of the problem is that the stream is front and center in the mural, and now the rocks just stick out like a sore thumb. And I thought I had chosen some cool-looking formations, but they look all jagged and fake. Also, I used a gray wash which is a bit darker than the other washes I have used so far, so they stand out even more. It can be fixed, in fact it will be an easy fix once I get working on the details in that area. It's just the first time (of many more times to come) that something didn't come out quite right at first.

The good news is, at least the rocks are in the right place and the scale looks right. I could go in there and fix them right away, but I'm going to wait. They stick out now, but as I add layers of color and more details to the mural they will blend in and become part of it. I will wonder why I ever thought they were wrong. Sometimes the things we think are "boulders" in our lives are like that too. At first they seem huge and it's hard to see around them, we wish they would just go away. Then, as we change course to adjust and add layers of experiences to our lives, they seem to soften and become an integral part of the scenery. I know the mural rocks will do just that.

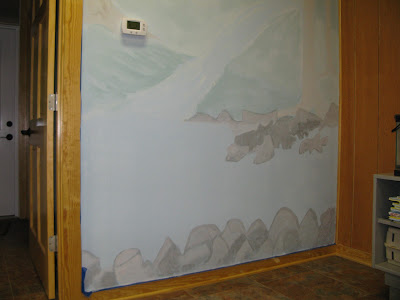
Jeez, I couldn't even get a good picture of the bad rocks! There are even more in a different part of the mural. 


So this week will be on to the big mammals. I have to look at lots of photos, try to find the ones that best match my vision for the composition, and adjust them to scale, just like I did for the rocks. I am going to put a nearly life-sized bear cub clinging to a tree right in front, with his mama peeking out from behind. It should be fun looking for images to match what I have in mind. For now, I am over the rocks and on to the next thing!

Monday, June 13, 2011

Sketchy Beginnings

Time to put some paint on the wall! And I did put lots of paint on the wall, though it doesn't look very colorful at this point. The locations of the mountains, large trees, and water have all been sketched in. The reason it does not look very colorful at this point is because I have not begun to use full-strength pigments yet. I have been mixing the pigments with a watered down white wall paint, to create what is called a "wash". I mixed up three of these washes: a slightly brown one for the trees, a blue tinted one for the water, and a greenish one for the mountains in the background. You can see the difference just enough to make out the shapes.


 The room was actually full of people while I was working, so I wasn't able to stand back enough to get a shot of the whole wall, but you get the idea. The room is a classroom and I knew I would be working while it was being used, so I was a little worried about noise and interruption. Turns out it didn't bother me at all. In fact, it kept me focused, and I enjoyed listening to the conversation going on around me as I worked.


There is one thing I may have to change: using the ladder. If I had set up a camera to take timed images of myself while I was working, I'm sure I would not see myself doing any painting in the time-lapse version. What I would see is a seemingly endless dance of moving the ladder, climbing it, climbing back down, moving it a bit, climbing up again, climbing down again, and them starting all over again. It wasn't very efficient. Also, I cannot directly face the wall while I'm working. It was OK for the big brush strokes I was using to put up the sketch, but it won't work when I am doing the detail work. I'll have to figure something out.

Next task is to go through hundreds of photographs of rocks and streams to see which piles of boulders I want to put in the water. Then I will draw those to scale on the grid and sketch them in the same way I did the trees and the mountains, using a different color wash. More details about that next time!

Saturday, June 4, 2011

Prepping the wall

The mural project is very exciting. Unfortunately, this part of the process is not very exciting! But it must be done, and it must be done correctly, if everything that follows is going to succeed. You know the old adage: "Measure twice, cut once. Measure once, cut twice". The prepping deserves to be described because, though rather boring, it is time consuming, and it is something that I learned from.

The wall originally had a couple of coats of what appeared to be a semi-gloss wall paint. This was not suitable for this project, due to the non-absorbent quality of the paint. We applied two coats of a flat primer. The first coat was white, and the second coat a light blue. I chose light blue to act as a unifying color for the entire mural. This is such a large project that there may end up being small (1/4" or less) areas that don't get painted. But there will be a non-white color in these spaces that will make it complete. The light blue color will make it seem as though a little bit of sky is being reflected throughout.

Normally I would use gesso (pronounced JESS-oh), a thick, acrylic-based primer, to prep a canvas. It acts as a sealant and tightens the canvas as it dries. It also provides "tooth" to the surface, which is to say that it gives it a little roughness for the paint to cling to. It is quite flat (no gloss) and somewhat absorbent. It is also very expensive, and would have cost a small fortune to put two coats on a 10x26 wall. Hence the decision to use wall primer instead. It's nice and flat, has some tooth, and took the blue tint nicely. It will work perfectly well for a fraction of the cost.

The next step was to transfer the grid to the wall. In this case the grid is made up of 3' squares. This provides a backbone for the mural, to make sure everything goes into its proper place. I had a few ideas for ways to do this. One was to use chalk lines. I tried one chalk line and didn't like it. Another was to put a push pin into each corner of every square, and I could use the pins later to hold my drawings in place while I was working. For those of you who speak pig latin, I decided to ix-nay the in-pays. I ended up using the KISS (keep it simple, stupid!) method to apply the grid. Working methodically with a ladder, a tape measure, a level, and a straight edge, we drew the grid with a pencil. Like I said earlier, not very exciting!

Here's Minal helping me put up the grid.  

You can see the light blue color, though it's prettier in real life. Normally I am not the measuring type. And the kind of work I have done has never really called for it. But in this case it was essential, and because of it I can work with more freedom and confidence.

The next step will be to rough in the landscape contours and trees. For this I will begin to apply color! It's actually a little scary...I'll let you know how it goes.